![]()
![]()
![]()
![]()
![]()
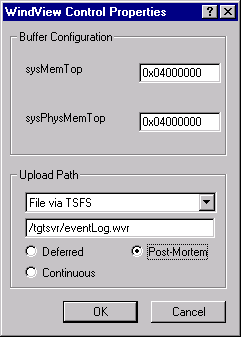
The upload mode is configured using the lower portion of the Upload Path section of the Control Properties dialog box shown in Figure 4-4.
The WindView default is deferred upload mode. The event data generated by your target is saved in the WindView dynamic ring buffer. At any time after logging is completed, you can upload the data from the buffer to WindView on the host for display, analysis, and storage. The steps of this upload process are described in 2.2.2 Collecting Data.
|
|
NOTE: If you request upload before stopping logging, logging stops and upload occurs; you cannot upload the buffer while simultaneously logging more data to it when you are using deferred upload mode.
|
||||||||||||||||||
Sometimes your situation requires that you collect very large amounts of data. For example, early in your analysis it may not be clear where the problem is. You can not use triggers to isolate the events of interest because you don't yet know how to characterize them. In this case, you can use continuous upload mode. This mode is more intrusive and will have more impact on the performance of your target, since the target must periodically stop its normal work to upload data to the host. On the other hand, you can collect more data than you have memory available on the target. Select continuous upload mode by clicking on the Continuous radio button.
Unlike the default deferred upload mode, continuous upload mode transfers data to the host whenever the amount of data stored in the buffers reaches the upload threshold. The upload threshold is calculated based on the buffer parameters you configure and an optimization algorithm. The data may be transferred to a file on the host or streamed to the WindView view graph, but it is transferred to the host when the upload threshold is reached without any action on your part, and logging continues uninterrupted.
Continuous upload mode takes advantage of the dynamic ring buffer to prevent buffer overflow during periods of heavy event generation. If the existing buffers fill, additional buffers are added to the ring. Once data collection slows and the buffers are emptied, excess buffers are deallocated. See 4.2 Dynamic Ring Buffer and 7.7 Dynamic Buffer Allocation.
Post-mortem mode applies to the specific case where an application failure is causing the target to reboot. Select post-mortem mode by clicking on the Post-Mortem radio button. When you select post-mortem mode, the Buffer Configuration portion of the dialog box changes as shown in Figure 4-2.
In this mode, WindView event data is logged to the dynamic ring buffer continually, wrapping around to write over the oldest data once all the individual buffers are full. Then, when the failure occurs, up to one full set of buffers worth of event data leading up to the failure will have been captured, providing useful diagnostic information. In addition to preserving the log itself for upload after a target reboot, WindView saves task name information in the reserved memory area. This information is uploaded to the target along with the event log. This means that tasks can be identified symbolically in the event log even though the application is no longer active on the target.
When not in post-mortem mode, the event buffer resides in VxWorks system memory. However, on many targets, the system memory region is reset during the booting sequence that occurs to re-establish the target following an application failure. For this reason, in order to ensure that the event log can be recovered for analysis after the reboot, you must identify a region of preserved memory so that the WindView can place your data in a memory region that is not overwritten during reboot.
|
|
NOTE: Be sure that the address range you choose for your preserved memory is aligned according to the requirements of your board.
|
||||||||||||||||||
|
|
WARNING: If you reconfigure your system memory to reserve a memory partition for your post-mortem buffer, you must rebuild your VxWorks image and your boot ROM, reboot your target, and reset the WindView configuration by clicking Reset in the Collection Configuration dialog box. See Post-Mortem Mode.
|
||||||||||||||||||
|
|
WARNING: The automatic configuration of the post-mortem region following reconfiguration of the boot ROM relies upon the values returned by sysMemTop( ) and sysPhysMemTop( ). Care should be taken to ensure that these values are valid for the specific target board you are using, as boards sharing the same BSP are often supplied with varying amounts of onboard memory.
|
||||||||||||||||||
 button or triggering.
 button in the Control window and wait for the target to reboot. This may require pressing the button on the front panel of the target or some equivalent action. However, do not remove power from the board as doing so clears all memory on most target boards.
![]()
![]()
![]()
![]()
![]()