![]()
![]()
![]()
![]()
![]()
|
|
WARNING: During development you must configure VxWorks with the target agent communication interface required for the connection between your host and target system (network, serial, NetROM, an so on). By default, VxWorks is configured for a network connection. Also note that before you use Tornado tools such as the shell and debugger, you must start a target server that is configured for the same mode of communication. See 2.4.2 Networking the Host and Target; and 3.5.1 Configuring a Target Server.
|
||||||||||||||||||
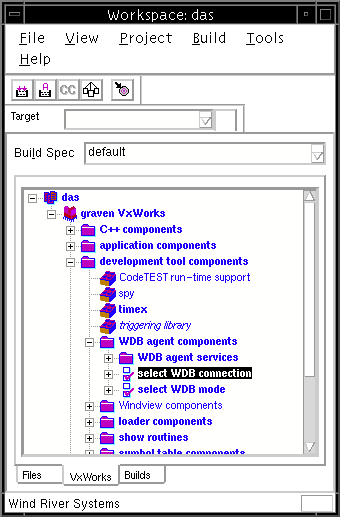
To display the options for the communication interface for the target agent in the VxWorks view, select development tool components>WDB agent components>select WDB connection (Figure 4-44).
To select an interface, select it from the list and select the Include 'component name' option from the context menu. (You can also make a selection by double clicking on the select WDB connection option to display the property sheet, and then making the selection from the Components page.)
To display general information about a component, or to change its parameters, simply double-click on its name, which displays its property sheet (see Figure 4-45). The options for the target agent communication interface are described below.
|
|
|
||||||||||||||||||
When VxWorks is configured with the standard network stack, the target agent can use an END (Enhanced Network driver) connection. Add the WDB END driver connection component. This connection has the same characteristics as the network connection, but also has a polled network interface that allows system and task mode debugging.
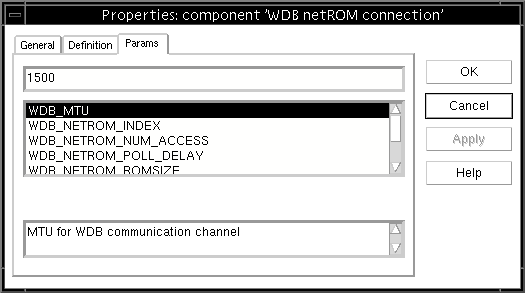
To configure the target agent to use a NetROM communication path, add the WDB netROM connection component. (See 2.5.4 The NetROM ROM-Emulator Connection).
Several configuration macros are used to describe a board's memory interface to its ROM banks. You may need to override some of the default values for your board. To do this, display the component property sheet, and select the Params tab to display and modify macro values (Figure 4-45).
The size of the NetROM dual-port RAM is 2 KB. The NetROM permits this 2 KB buffer to be assigned anywhere in the pod 0 memory space. The default position for the NetROM dual-port RAM is at the end of the pod 0 memory space. The following line in target/src/config/usrWdb.c specifies the offset of dual-port RAM from the start of the ROM address space.
dpOffset = (WDB_ROM_SIZE - DUALPORT_SIZE) * WDB_NETROM_WIDTH;
If your board has more than one ROM socket, this calculation gives the wrong result, because the VxWorks macro ROM_SIZE describes the total size of the ROM space--not the size of a single ROM socket. In that situation, you must adjust this calculation.
Refer to the NetROM documentation for more information on the features governed by these parameters.
|
|
WARNING: On Intel i960 processors, the IMI (Initial Memory Image) file is located at the top of the ROM, and this memory space cannot be used for communication between the target server and the target agent (netrom dual-port RAM). WDB_NETROM_ROMSIZE must be assigned the value WDB_NETROM_ROM_SIZE ROM_SIZE - 0x1000. The dualport RAM base address in the NetROM must also be modified to reflect this change. For example, for a 27020 EPROM, dprbase should be set to 0x3e800 (rather than the default 0x3f800).
|
||||||||||||||||||
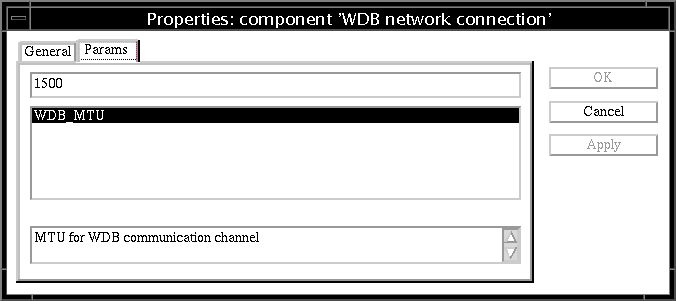
To configure the target agent for use with a network connection, add the WDB network connection component. (See 2.5.1 Network Connections).
The default MTU is 1500 octets. To change it, display the component property sheet, select the Params tab, select WDB_MTU item and change the value associated with it (Figure 4-46).
To configure the target agent to use a raw serial communication path, add the WDB serial connection component. (See 2.5.3 Serial-Line Connections).
By default, the agent uses serial channel 1 at 9600 bps.1 For better performance, use the highest line speed available, which is often 38400 bps. Try a slower speed if you suspect data loss. To change the speed, display the component property sheet, select the Params tab, select WDB_TTY_BAUD and change the value associated with it.
In a memory-constrained system, you may wish to create a smaller agent. To reduce program text size, you can remove the following optional agent facilities:
These components are in the development tool components>WDB agent components>WDB agent services folder path.
You can also reduce the maximum number of WDB breakpoints with the WDB_BP_MAX parameter of the WDB breakpoints component. And if you are using a serial connection, you can set the INCLUDE_WDB_TTY_TEST parameter to FALSE.
If you are using a communication path which supports both system and task mode agents, then by default both agents are started. Since each agent consumes target memory (for example, each agent has a separate execution stack), you may wish to exclude one of the agents from the target system. You can configure the target to use only a task-mode agent or only a system-mode with the WDP task debugging or WDB system debugging options (which are in the folder path development tool components>WDB agent components>select WDB mode).
If your application (or BSP) uses excHookAdd( ) to handle exceptions, host tools will still be notified of all exceptions (including the ones handled by your exception hook). If you want to suppress host tool notifications, you must exclude the component WDB exception notification. When this component is excluded, the target server is not notified of target exceptions, but the target will still report them in its console. In addition, if an exception occurs in the WDB task, the task will be suspended and the connection between the target server and the target agent will be broken.
By default, the target agent is initialized near the end of the VxWorks initialization sequence. This is because the default configuration calls for the agent to run in task mode and to use the network for communication; thus, wdbConfig( ) must be called after kernelInit( ) and usrNetInit( ). (See VxWorks Programmer's Guide: Configuration and Build for an outline of the overall VxWorks initialization sequence.)
In some cases (for example, if you are doing a BSP port for the first time), you may want to start the agent before the kernel starts, and initialize the kernel under the control of the Tornado host tools. To make that change, perform the following steps when you configure VxWorks:
InitGroup usrWdbInit {
    INIT_RTN    usrWdbInit (); wdbSystemSuspend ();
    _INIT_ORDER usrInit
    INIT_BEFORE INCLUDE_KERNEL
}
After the target server connects to the system-mode target agent, you can resume the system to start the kernel under the agent's control. (See 5.2.6 Using the Shell for System Mode Debugging for information on using system mode from the shell, and 7.5 System-Mode Debugging for information on using it from the debugger.
After connecting to the target agent, set a breakpoint in usrRoot( ), then continue the system. The routine kernelInit( ) starts the multi-tasking kernel with usrRoot( ) as the entry point for the first task. Before kernelInit( ) is called, interrupts are still locked. By the time usrRoot( ) is called, interrupts are unlocked.
Errors before reaching the breakpoint in usrRoot( ) are most often caused by a stray interrupt: check that you have initialized the hardware properly in the BSP's sysHwInit( ) routine. Once sysHwInit( ) is working properly, you no longer need to start the agent before the kernel.
|
|
CAUTION: If you are using the NetROM connection, and the agent is started before the kernel, then the agent cannot spawn the NetROM polling task to check periodically for incoming packets from the host. As a result there is no way for the host to get the agent's attention until a breakpoint occurs. On the other hand, there is no good reason to do so: you can set breakpoints in usrRoot( ) to verify that VxWorks can get through this routine. Once this routine is working, you can start the agent after the kernel (that is, within the usrRoot( ) routine), after which the polling task is spawned normally.
|
||||||||||||||||||
|
|
WARNING: If you are using the serial connection, take care that your serial driver does not cause a stray interrupt when the kernel is started, because the serial-driver interrupt handlers are not installed until after usrRoot( ) begins executing: the calling sequence is usrRoot( ) ‡ sysClkConnect( ) ‡ sysHwInit2( )‡ intConnect( ). You may want to modify the driver so that it does not set a channel to interrupt mode until the hardware is initialized. This can be done by setting a flag in the BSP after serial interrupts are connected.
|
||||||||||||||||||
1: VxWorks serial channels are numbered starting at zero. Channel 1 corresponds to the port labeled COM2 if the board's ports are labeled starting at 1. If your board has only one serial port, you must change WDB_TTY_CHANNEL to 0 (zero).
2: The code generator for prjConfig.c is based on a component descriptor language that specifies when components are initialized. The component descriptors are searched in a specific order, with the project directory last in the search path. This allows the .cdf files in the project directory to override default definitions in the generic .cdf files.
![]()
![]()
![]()
![]()
![]()