![]()
![]()
![]()
![]()
![]()
You can add entries to the Tools menu to allow easy access to additional tools. Before you add any commands in this part of the menu, Tornado displays the placeholder No Custom Tools as a disabled menu entry. The Customize command in the Tools menu allows you to add (or remove) entries at the end of the Tools menu.
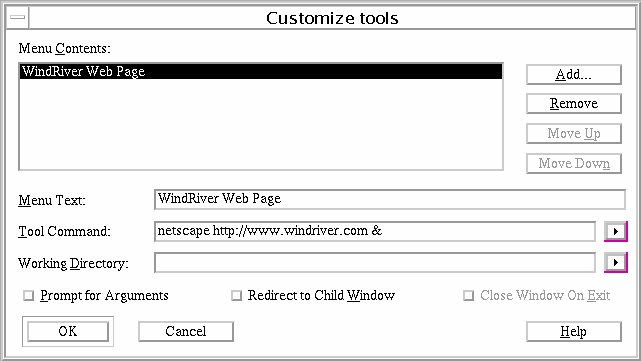
Click Tools>Customize to open the Customize Tools dialog box (Figure 8-4).
The Menu Contents list box in the Customize Tools dialog box shows all custom commands currently in the Tools menu. When you select any item in this list, you can edit its attributes in the three text boxes near the bottom of the dialog box.
The three text boxes near the bottom of the Customize Tools dialog box allow you to specify or change the attributes of a custom command.
The pop-up menu opened by the buttons to the right of the text boxes provides several macros for your use in custom menu commands. These macros allow you to write custom commands that are sensitive to the context in the editor, or to the global Tornado context. For example, there are macros for the full path of the file in the active editor window, and for useful fragments of that file's name. Table 8-2 lists macros for editor context; in this table, the phrase active file refers to the file that is currently selected in the project facility.
|
|
|||||||||||||||||||
|
|
|||||||||||||||||||
|
|
|||||||||||||||||||
Table 8-3 lists macros for the project facility context.
|
|
|||||||||||||||||||
|
|
|||||||||||||||||||
|
|
|||||||||||||||||||
Table 8-4 lists macros for the global Tornado context.
|
|
|||||||||||||||||||
|
|
|||||||||||||||||||
|
|
|||||||||||||||||||
When creating a menu command be sure to check Redirect to Child Window for all applications that do not automatically open their own shell or window. Otherwise the command will attempt to run in the window that launched Tornado, if that window is still open. Thus an editor or version control command should be redirected, but a call to a browser need not be.
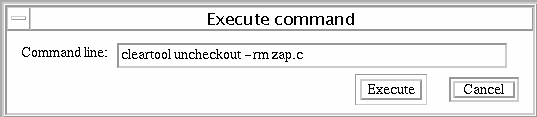
This example illustrates how to use the Customize Tools dialog box to add an Uncheckout command to the Tools menu: the command cancels the checkout of whatever file is currently open in Tornado (that is, the file visible in the current editor window). Figure 8-6 illustrates the specification for a ClearCase command to uncheckout a module.
The Menu Text entry indicates that the command unchecks out a file, but is not specific to any particular file. The Tool Command field uses the $filepath macro (Macros for Customized Menu Commands) to expand the current file to its full path name.
In this example, the Prompt for Arguments and Redirect to Child Window boxes are checked. When the new Uncheckout command in the Tools menu is executed, the predefined argument list appears as a default in a dialog box (shown in Figure 8-7), to permit specifying other arguments if necessary.
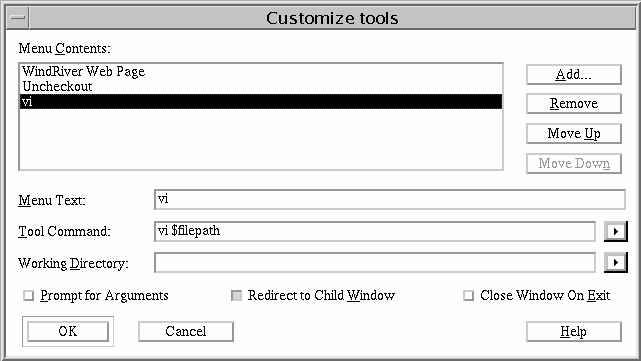
Figure 8-8 illustrates the specification for a command to run the UNIX vi editor on the file that is currently open in Tornado. The Menu Text contains a useful name, while the Tool Command field uses the actual execution command and $filepath to identify the current file. In this case, Prompt for Arguments is not checked; thus the editor runs immediately. Again, Redirect to Child Window is checked so that the editor will open in a new window.
Tornado includes a suite of software-development utilities described in the GNU ToolKit User's Guide: The GNU Binary Utilities. If you execute any of these utilities frequently, it may be convenient to define commands in the Tools menu for that purpose.
Figure 8-9 illustrates the specification for a command to run the sizearch utility, which lists the size of each section of an object module for target architecture arch. In this example, the Tool Command field constructs the path and name of the object file generated from the current source file using $filedir/SIMSPARCSOLARISgnu/$basename. The Working Directory field is filled in using the browse option to locate the appropriate version of sizearch in the correct directory.
You can add a Tools command to link your Web browser directly to announcements from Wind River Systems (and to related Internet resources). Figure 8-10 shows the specification for a Wind River Web Page command. (For a description of the information available on the WRS home page, see 9.3 WRS Broadcasts on the World Wide Web.
Tornado itself does not include a Web browser. If you do not have a Web browser, or your system does not have direct Internet access, ignore this example; it provides convenient access to information, but no essential functionality.
![]()
![]()
![]()
![]()
![]()