![]()
![]()
![]()
![]()
![]()
This section describes the debugger commands and controls in detail. 7.4.1 Graphical Controls is a complete discussion of all graphical debugger controls. 7.4.2 Debugger Command Panel: GDB discusses when to use the command panel rather than graphical controls, and what commands are particularly useful because of their effects on the graphical context.
 ). The sash allows you to allocate space between the two panels. To change the amount of space each panel takes up in the overall display, drag the small square up or down with your mouse.
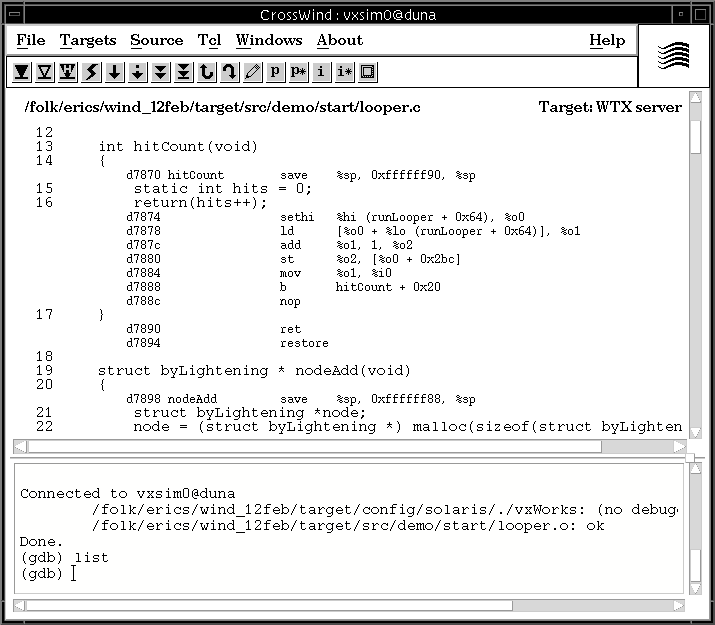
The menu bar at the top of the debugger display provides commands for overall control of the debugger display or debugging session (Figure 7-2).
The following paragraphs describe the effect of each debugger-specific menu command.
|
|
CAUTION: Because the download is controlled by the target server, a download can fail when the server and CrossWind have different views of the file system. See Extended Debugger Variables.
In the command panel, you can use a form of the load command to get around this problem. See What Modules to Debug. |
||||||||||||||||||
|
|
CAUTION: If you select a command from the Targets menu while the debugger is attached to a running task, the command does not take effect until the next time the task stops. You can force the task to stop by pressing the
 interrupt button.
 |
||||||||||||||||||
|
|
NOTE: For some source lines, compilers can generate code that is not contiguous, because it is sometimes more efficient to interleave the object code from separate lines of source.
In this situation, the mixed-mode display rearranges the assembly listing to group all object code below the line that generates it. The debugger indicates any rearranged chunks of the assembly with an asterisk at the start of each non-contiguous segment in the mixed-mode display. |
||||||||||||||||||
The Tcl menu provides a way to re-initialize the debugger. Because the debugger can be customized on the fly (see 7.7 Tcl: CrossWind Customization), this provides a way to restore the environment after experiments with custom modifications.
The Windows menu controls auxiliary debugger displays. All such displays are automatically updated whenever the control of execution passes to the debugger--for example, at each breakpoint, or after single-stepping.
The Help menu has the standard entries On CrossWind (the debugger's reference entry), Manuals Index (the online search tool), and Manuals Contents (the start of the Tornado online manuals). It also has one additional entry. The GDB Online command brings up an auxiliary viewer for the command-language usage summaries built into GDB.
Just below the menu bar is a row of buttons called the button bar. These buttons provide quick access to the most important debugger functionality. The following paragraphs describe each button:
|
|
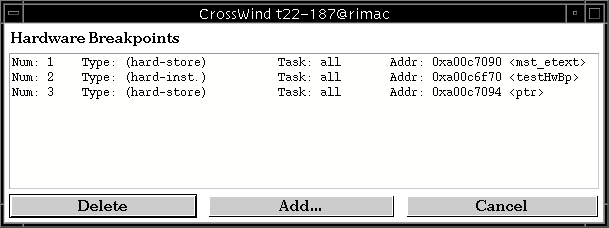
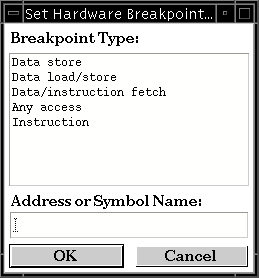
NOTE: CrossWind does not manage hardware breakpoints in the same manner as standard GDB breakpoints. The hardware breakpoint interface is provided as a simple means of setting hardware breakpoints on the target (which is why it is only possible to set hardware breakpoints on all the tasks or on the system context, and not only on the task to which the debugger is attached).
When a data access hardware breakpoint stops the program, the context icon indicates the line of code that has been executed. However, on some processors (such as the I960), a data access exception is generated only after the data has been accessed and the program counter has been incremented. For those processors, CrossWind marks the line after the one that has been executed when data hardware breakpoint was hit. |
||||||||||||||||||
 button: instead of stepping to the very next statement executed (which, in the case of a function call, is typically not the next statement displayed), this button steps to the next line on the screen. If there is no intervening function call, this is the same thing as the
  button. But if there is a function call, the
  button executes that function in its entirety, then stops at the line after the function call.
 button: thus, the
  button steps to either the next machine instruction or the next source statement, if necessary completing a subroutine call first.
  button, and like it, affects the data you can see but not the state of your program.
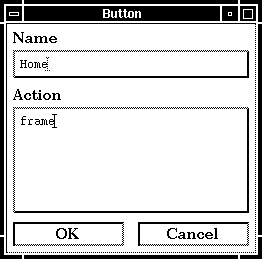
 toolBarItemCreate Home button {ttySend "frame\n"}
CrossWind is designed to provide graphical access to those debugger actions that are best controlled graphically, but also to exploit the command-line GDB interface when that is the best way to perform some particular action. For example, the housekeeping of getting subroutines started necessarily involves typing subroutine names and argument lists. So that you do not have to switch back and forth between menus, buttons, and dialogs or forms for commands of this sort, the debugger exploits the command panel, which is inherently best suited to commands with typed arguments. The command panel provides full access to the GDB command language described in the GDB manual, Debugging with GDB.
|
|
NOTE: As a convenience, the GDB command interpreter repeats the previous command when you press ENTER (or RETURN) on an empty line, except for a few commands where it would be dangerous or pointless. See Debugging with GDB: GDB Commands for more information. Press ENTER in the debugger only when you want to execute or repeat a command.
|
||||||||||||||||||
One use of the command panel is to experiment with text-based commands for debugger actions that you might want to perform automatically.
When the debugger first executes GDB,3 it looks for a file named .gdbinit: first in your home directory, then in your current working directory. If it finds the file in either directory, the debugger commands in it are executed; if it finds the file in both directories, the commands in both are executed.
A related initialization file under your home directory, called .wind/gdb.tcl, is specifically intended for Tcl code to customize GDB with your own extensions written in Tcl. The Tcl code in this file executes before .gdbinit. See 7.6 Tcl: Debugger Automation for a discussion of extending GDB through Tcl. See also 7.7.1 Tcl: Debugger Initialization Files for a discussion of how the various CrossWind initialization files interact.
After a debugging session is underway, the program-display panel keeps pace with execution: when the program hits a breakpoint, the corresponding source is centered on the display panel, and each time you step or continue program execution, the display scrolls accordingly.
When you begin your debugging session by attaching to an existing task, the display panel is filled immediately as a side effect of stopping the task. In other situations, it may be convenient to use one of the commands in this section for an initial display.
Just as with the Tornado shell, you can execute any subroutine in your application from the debugger. Use the following commands:
When you run a routine from the debugger using one of these commands, the routine runs until it encounters a breakpoint or a signal, or until it completes execution. The normal practice is to set one or more breakpoints in contexts of interest before starting a routine. However, you can interrupt the running task by clicking on the interrupt button  or by keying the interrupt character (as set on your host with stty intr; usually CTRL+C) from the debugger window.
By default, any tasks you start with the run command use the standard I/O channels assigned globally in VxWorks. However, the debugger has the following mechanisms to specify input and output channels:
(gdb) run appMain > /dev/ttyp2 < @/tyCo/0
(gdb) tty /dev/ttyp2
Certain GDB commands, even though typed in the command panel, are especially useful due to the CrossWind graphical presentation. Among these are list, search, and rev, discussed already in What Code to Display. The following commands are also especially useful because of CrossWind graphical extensions:
 and
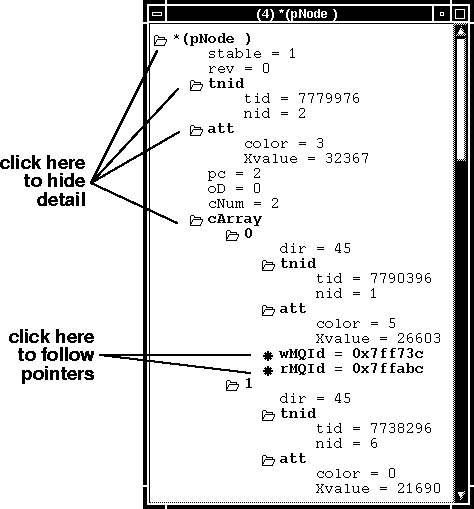
and  buttons provide a convenient way to generate active displays of symbol and pointer values, allowing you to monitor important data as your application executes under debugger control. However, sometimes the most useful data to monitor is the result of an expression--something that does not appear in your program, and hence cannot be selected before clicking a button.
Instead of using the Targets menu (CrossWind Menus), you can select a target from the command panel with the target wtx command. The two methods of selecting a target are interchangeable; however, it may sometimes be more convenient to use the GDB command language--for example, you might specify a target this way in your .gdbinit initialization file or in other debugger scripts.
set editing-mode vi
The command area also provides two kinds of extended commands:
|
|
CAUTION: The debugger does not include the shell's C interpreter; thus, the "wind-" commands are interfaces only to the underlying Tcl implementations of the shell primitives. For shell primitives that take no arguments, this makes no difference; but for shell primitives that require an argument, you must use the shell Tcl command shSymAddr to translate C symbols to the Tcl form. For example, to call the shell built-in show( ) on a semaphore ID mySemID, use the following:
(gdb) wind-show [shSymAddr mySemId] |
||||||||||||||||||
You can change many details of the debugger's behavior by using the set command to establish alternative values for internal parameters. (The show command displays these values; you can list the full set interactively with help set.)
The following additional set/show parameters are available in CrossWind beyond those described in Debugging with GDB:
1: The hardware breakpoint list is refreshed at a regular interval (five seconds by default). It allows you to see the hardware breakpoints set or removed by other tools (such as the shell, WindSh). To change the polling interval or simply suppress polling, edit your ~/.wind/crosswind.tcl file (set hwBpPollInterval to 0 to suppress polling). If polling is suppressed, the hardware breakpoint list is only updated when the Add or Delete buttons are used.
2: Display numbers are useful with the GDB commands delete display, disable display, and info display, which you can execute in the command panel. See Debugging with GDB for details.
3: The graphical interface to the debugger has a separate initialization file .wind/crosswind.tcl, which runs after .gdbinit.
4: See also the description of wtx-load-path-qualify in Extended Debugger Variables for another way of managing how the debugger reports load pathnames to the target server.
5: There is one exception: the Meta key is not available, because it is reserved for keyboard shortcuts that select items from menus. Instead, use the ESC key as a Meta prefix, as usual in Emacs and related programs when no Meta key is available.
![]()
![]()
![]()
![]()
![]()


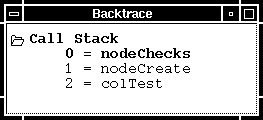
 to view a stack level where source code is visible, or use the finish button
  to allow the system routine to return to its caller.