![]()
![]()
![]()
![]()
![]()
The WindView optional product is an extension to the Tornado cross-development environment. You must have Tornado installed in order to install WindView. If you are installing Tornado for the first time when you install WindView, you will only have to run SETUP once. If you already have Tornado 2.0 installed, run SETUP with your WindView installation key to install WindView. For detailed information on running SETUP, see Tornado Getting Started.
|
|
NOTE: In the Choose Destination Location dialog box, be sure to specify a directory where you have already installed Tornado.
|
||||||||||||||||||
When you install WindView, the default configuration does almost everything necessary for you to begin collecting and analyzing data immediately. The only other step you need to take, in addition to installing WindView, is to reconfigure and build VxWorks to include the WindView libraries. When you start your target and start WindView, WindView collects data on how your real-time system is running and uploads it to your development host.
For information on configuring WindView libraries into VxWorks, see Tornado User's Guide: Projects. The configuration macro for WindView is INCLUDE_WINDVIEW.1
When you install and run WindView, the instrumented kernel tags certain events with either high-resolution timestamps or with sequence numbers; for background information, see 7.6 Timestamping. Any BSP provided by Wind River Systems that provides a timestamp driver is listed in the WindView 2.0 Release Notes. The configuration macro for the timestamp driver is INCLUDE_TIMESTAMP.
The drivers are in the directory installDir/target/src/drv/timer; the corresponding header files are in installDir/target/h/drv/timer.
On supported targets with limited hardware resources, the system clock, the auxiliary clock, or both may be taken over by WindView when the timestamp driver is enabled. In this case, these clocks are not available for system or application use. For example, the Motorola MVME147 timestamp driver uses the auxiliary clock; thus, that clock is not available for other uses.
If you are using a board that does not have a timestamp driver or if you do not enable the driver with INCLUDE_TIMESTAMP, the BSP is compiled with the sequential event display driver rather than the timestamp driver.
In order to upload your data from the target to the host, you must provide an upload path. The following options are available:
If no upload path is selected, but INCLUDE_WINDVIEW is selected, then INCLUDE_WVUPLOAD_FILE and INCLUDE_WVUPLOAD_TSFSSOCK are defined automatically.
To upload WindView data to a file, you must have a file system defined. To upload to the WindView view graph, you must define a socket facility. The easiest way to include these facilities is to configure the Target Server File System (TSFS), which supports upload to both files and sockets. For detailed information on TSFS, see the VxWorks Programmer's Guide: Local File Systems.
To configure TSFS into your system for use with either upload option, the following options are available:
There is no automatic dependency checking between INCLUDE_WDB_TSFS and INCLUDE_WDB, but WDB must be included for TSFS to work. The WDB agent is included in the default VxWorks configuration (see the project facility), but you should confirm that you have not changed that default.
|
|
NOTE: If you are running the Tornado tools on a PC host and wish to use TSFS, you must be sure that you have set the environment variable WIND_UID. See the VxWorks Programmer's Guide: Local File Systems.
|
||||||||||||||||||
If you choose not to use TSFS and you want to upload WindView data to a file, you must include another file system. No file system is included in VxWorks by default. For information on how to configure a file system such as NFS, see the VxWorks Network Programmer's Guide: File Access Applications and Tornado User's Guide: Projects.
If you choose not to use TSFS and you want to upload data to the view graph, you must have a socket facility defined. Sockets are discussed in the VxWorks Network Programmer's Guide: Networking APIs.
If you plan to use WindView to analyze causes of target failure, see Post-Mortem Mode for additional configuration information.
After all products have been installed and configured, remake the vxWorks image as described in Tornado User's Guide: Projects and reboot your target with the new image.
Note that the VxWorks boot ROM does not need to be rebuilt unless you are using a VxWorks standalone ROM or unless you are configuring VxWorks and WindView for post-mortem analysis using a reserved memory partition.
|
|
NOTE: In order to simplify troubleshooting, make sure that the basic host-target connection is working before you enable WindView. If you have not yet used Tornado with your target, follow the instructions in the Tornado User's Guide: Setup and Startup before you try to use WindView.
|
||||||||||||||||||
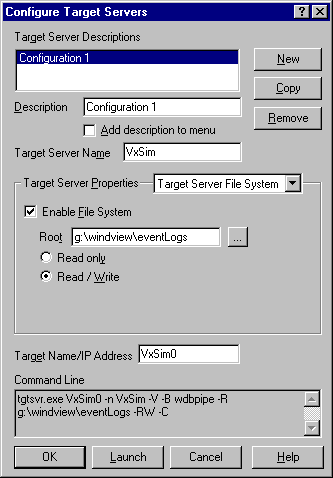
Select Target Server>Configure from the main Tools menu. In the Configure Target Servers dialog box (see Figure 2-8), select Target Server File System in the Change Property drop-down combo box.
C:\WindView\logfiles
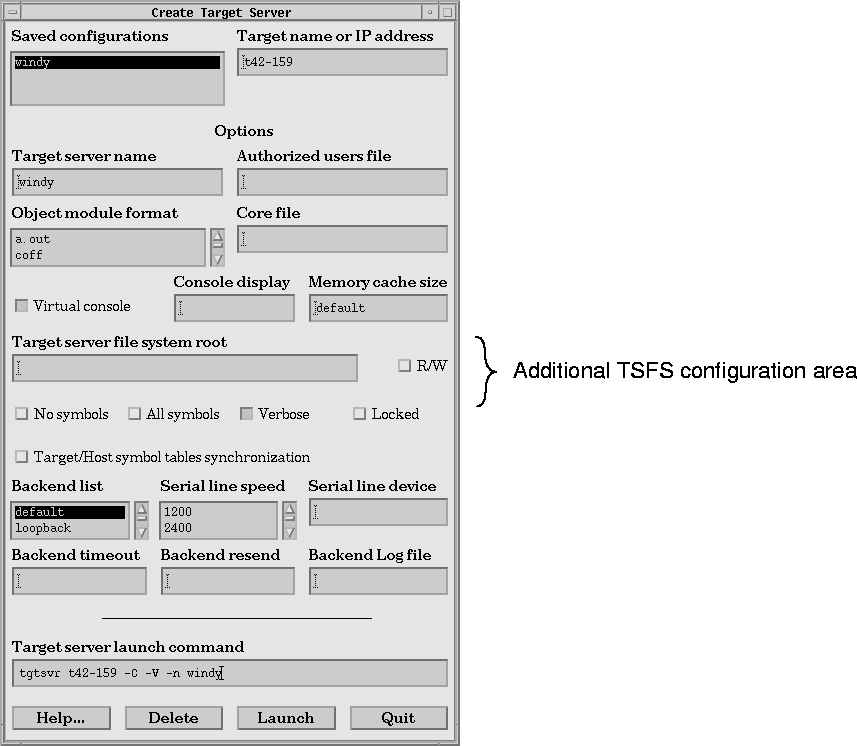
Select Target >Create from the Tornado Launcher menu. In the Create Target Servers window (see Figure 2-9), fill in the appropriate boxes.
/usr/windview/logfiles
1: When INCLUDE_WINDVIEW is selected, several WindView initialization routines are called from usrRoot( ) in usrConfig.c. Be aware that if you customize usrConfig.c, WindView initialization must happen after the kernel initialization; it cannot occur before.
![]()
![]()
![]()
![]()
![]()